> ## Documentation Index
> Fetch the complete documentation index at: https://cantonfoundation-repair-canton-nodes.mintlify.site/llms.txt
> Use this file to discover all available pages before exploring further.
# Prerequisites and Installation
> Set up your development environment and install the Canton Network QuickStart
# Canton Network quickstart installation
## Introduction
The Quickstart application helps you and your team become familiar with CN application development by providing **essential** scaffolding. The Quickstart application provides a launchpad and is intended to be extended to meet your business needs. When you are familiar with the Quickstart, review the technology choices and application design to determine what changes are needed. Technology and design decisions are ultimately up to you.
## Overview
This guide walks through the installation and `LocalNet` deployment of the CN Quickstart. We have provided a [fast path installation](#fast-path-installation) and [step-by-step instructions](#step-by-step-instructions), based on level of experience, for your convenience. Please contact your representative at Canton Network if you find errors.
### Roadmap
* After installation, [explore the demo](/appdev/quickstart/running-the-demo) to complete a business operation in the example application.
* For an overview of how the Quickstart project is structured, read the [project structure guide](/appdev/quickstart/project-structure).
* Learn about debugging using lnav in the [Debugging and troubleshooting with lnav](/appdev/quickstart/lnav).
* Additional debugging information is in the section in the observability and troubleshooting section of the [cn-quickstart repository](https://github.com/digital-asset/cn-quickstart).
## Prerequisites
Access to the [CN-Quickstart GitHub repository](https://github.com/digital-asset/cn-quickstart) is public.
The CN Quickstart is a Dockerized application and requires [Docker Desktop](https://www.docker.com/products/docker-desktop/). We recommend allocating 8 GB of memory to Docker Desktop. Allocate additional resources if you witness unhealthy containers, if possible. Decline Observability if your machine does not have sufficient memory.
Other requirements include:
* [Curl](https://curl.se/download.html)
* [Direnv](https://direnv.net/docs/installation.html)
* [Nix](https://nixos.org/download/)
* Windows users must install and use [WSL 2](https://learn.microsoft.com/en-us/windows/wsl/install) with administrator privileges.
### Nix download support
Check for Nix on your machine:
```bash theme={"theme":{"light":"github-light","dark":"github-dark"}}
nix --version
```
If the command returns something like `Nix (Nix) 2.25.2`, you're done.
Recommended installation for MacOS:
```bash theme={"theme":{"light":"github-light","dark":"github-dark"}}
sh <(curl -L https://nixos.org/nix/install)
```
Recommended installation for Linux (Windows users should run this and all following commands in WSL 2):
```bash theme={"theme":{"light":"github-light","dark":"github-dark"}}
sh <(curl -L https://nixos.org/nix/install) --daemon
```
## Fast path installation
If you are familiar with the prerequisites, use these abbreviated installation instructions. More detailed instructions are provided in the [step-by-step instructions](#step-by-step-instructions) below.
Clone the repository, provision the toolchain, and build the application. These steps run in order, in a single terminal:
```bash theme={"theme":{"light":"github-light","dark":"github-dark"}}
# Clone from GitHub and move into the repository (see "Clone from GitHub" below)
git clone https://github.com/digital-asset/cn-quickstart.git
cd cn-quickstart
# Allow Direnv to provision the development toolchain from the repository root
direnv allow
# Verify that Docker Desktop is running on your computer (see "Docker" below)
docker info
# Log in to Docker repositories via the terminal
docker login
# Move into the quickstart subdirectory
cd quickstart
# Configure the local development environment (see "Deploy a validator on LocalNet" below)
# When prompted: enable OAuth2, disable Observability, disable TEST MODE, leave the party hint blank for the default value
make setup
# Build the application
make build
```
The remaining steps run in separate terminals at the same time, so they can't be combined into one block:
```bash theme={"theme":{"light":"github-light","dark":"github-dark"}}
# New terminal window, from quickstart/ — initiate log collection
make capture-logs
```
```bash theme={"theme":{"light":"github-light","dark":"github-dark"}}
# Back in the original terminal, from quickstart/ — start the application and Canton services
make start
```
```bash theme={"theme":{"light":"github-light","dark":"github-dark"}}
# Optional — separate shell, from quickstart/ — run the Canton Console (see "Connecting to the Local Canton Nodes" below)
make canton-console
```
```bash theme={"theme":{"light":"github-light","dark":"github-dark"}}
# Optional — fourth shell, from quickstart/ — begin the Daml Shell
make shell
```
When you're done (see [Closing the application](#closing-the-application) below):
```bash theme={"theme":{"light":"github-light","dark":"github-dark"}}
# Close the application and other services
make stop && make clean-all
```
If applicable, close Canton Console with `exit` and close Daml Shell with `quit`.
## Step-by-step instructions
### Clone from GitHub
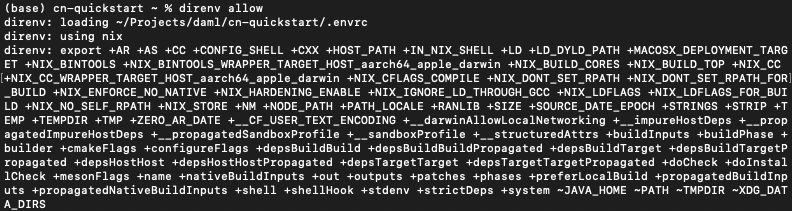
Clone and **cd** into the `cn-quickstart` repository into your local machine.
```bash theme={"theme":{"light":"github-light","dark":"github-dark"}}
git clone https://github.com/digital-asset/cn-quickstart.git
cd cn-quickstart
direnv allow
```
 ### Docker
Verify that the Docker Desktop application is running on your computer.
Login to Docker repositories via the terminal.
```bash theme={"theme":{"light":"github-light","dark":"github-dark"}}
docker login
```
The last command requires a [Docker Hub](https://app.docker.com/) username and password or *Personal Access Token (PAT)*.
Commands should return ‘Login Succeeded’.
### Change to the quickstart directory
The development toolchain, including the Daml tooling, JDK, and Node.js, is provisioned automatically by Nix when you run `direnv allow` in the repository root.
**cd** into the `quickstart` subdirectory.
```bash theme={"theme":{"light":"github-light","dark":"github-dark"}}
cd quickstart
```
The `Makefile` providing project choreography is in the `quickstart/` directory. `make` only operates within `quickstart/`.
If you see errors related to `make`, double check your present working directory.
### Deploy a validator on LocalNet
Configure the local development environment by running `make setup`.
Disable `Observability`. Enable OAuth2. Leave the party hint blank to use the default and disable `TEST MODE`.
The party hint is used as a party node's alias of their identification hash. The Party Hint is not part of the user's identity. It is a convenience feature. It is possible to have multiple party nodes with the same hint.
```text theme={"theme":{"light":"github-light","dark":"github-dark"}}
% make setup
Starting local environment setup tool...
./gradlew configureProfiles --no-daemon --console=plain --quiet
Enable Observability? (Y/n): n
OBSERVABILITY_ENABLED set to 'false'.
Enable OAUTH2? (Y/n): y
AUTH_MODE set to 'oauth2'.
Specify a party hint (this will identify the participant in the
network) [quickstart-USERNAME-1]:
PARTY_HINT set to 'quickstart-USERNAME-1'.
Enable TEST_MODE? (Y/n): n
TEST_MODE set to 'off'.
.env.local updated successfully.
```
You can change these choices any time by running `make setup` again.
OAuth2 and Observability may be unstable if your machine has less than 8 GB of memory to allocate to Docker Desktop.
Build the application.
```bash theme={"theme":{"light":"github-light","dark":"github-dark"}}
make build
```
### Docker
Verify that the Docker Desktop application is running on your computer.
Login to Docker repositories via the terminal.
```bash theme={"theme":{"light":"github-light","dark":"github-dark"}}
docker login
```
The last command requires a [Docker Hub](https://app.docker.com/) username and password or *Personal Access Token (PAT)*.
Commands should return ‘Login Succeeded’.
### Change to the quickstart directory
The development toolchain, including the Daml tooling, JDK, and Node.js, is provisioned automatically by Nix when you run `direnv allow` in the repository root.
**cd** into the `quickstart` subdirectory.
```bash theme={"theme":{"light":"github-light","dark":"github-dark"}}
cd quickstart
```
The `Makefile` providing project choreography is in the `quickstart/` directory. `make` only operates within `quickstart/`.
If you see errors related to `make`, double check your present working directory.
### Deploy a validator on LocalNet
Configure the local development environment by running `make setup`.
Disable `Observability`. Enable OAuth2. Leave the party hint blank to use the default and disable `TEST MODE`.
The party hint is used as a party node's alias of their identification hash. The Party Hint is not part of the user's identity. It is a convenience feature. It is possible to have multiple party nodes with the same hint.
```text theme={"theme":{"light":"github-light","dark":"github-dark"}}
% make setup
Starting local environment setup tool...
./gradlew configureProfiles --no-daemon --console=plain --quiet
Enable Observability? (Y/n): n
OBSERVABILITY_ENABLED set to 'false'.
Enable OAUTH2? (Y/n): y
AUTH_MODE set to 'oauth2'.
Specify a party hint (this will identify the participant in the
network) [quickstart-USERNAME-1]:
PARTY_HINT set to 'quickstart-USERNAME-1'.
Enable TEST_MODE? (Y/n): n
TEST_MODE set to 'off'.
.env.local updated successfully.
```
You can change these choices any time by running `make setup` again.
OAuth2 and Observability may be unstable if your machine has less than 8 GB of memory to allocate to Docker Desktop.
Build the application.
```bash theme={"theme":{"light":"github-light","dark":"github-dark"}}
make build
```
 In a new terminal window, initiate log collection from the `quickstart` subdirectory.
```bash theme={"theme":{"light":"github-light","dark":"github-dark"}}
make capture-logs
```
Once complete, return to the previous terminal to start the application and Canton services.
```bash theme={"theme":{"light":"github-light","dark":"github-dark"}}
make start
```
### Connecting to the Local Canton Nodes
In a separate shell, from the `quickstart` subdirectory, run the Canton Console.
```bash theme={"theme":{"light":"github-light","dark":"github-dark"}}
make canton-console
```
In a new terminal window, initiate log collection from the `quickstart` subdirectory.
```bash theme={"theme":{"light":"github-light","dark":"github-dark"}}
make capture-logs
```
Once complete, return to the previous terminal to start the application and Canton services.
```bash theme={"theme":{"light":"github-light","dark":"github-dark"}}
make start
```
### Connecting to the Local Canton Nodes
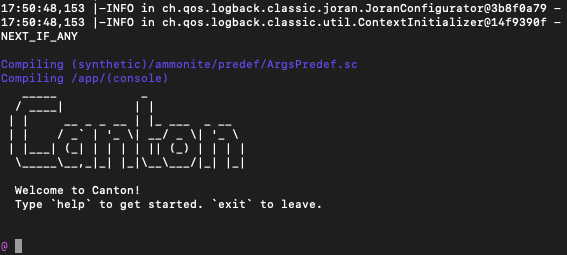
In a separate shell, from the `quickstart` subdirectory, run the Canton Console.
```bash theme={"theme":{"light":"github-light","dark":"github-dark"}}
make canton-console
```
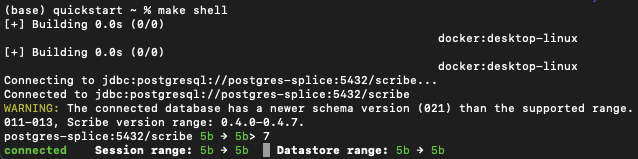
 In a fourth shell, from the quickstart subdirectory, begin the Daml Shell.
```bash theme={"theme":{"light":"github-light","dark":"github-dark"}}
make shell
```
In a fourth shell, from the quickstart subdirectory, begin the Daml Shell.
```bash theme={"theme":{"light":"github-light","dark":"github-dark"}}
make shell
```
 ### Closing the application
*⚠️ (If you plan on immediately using the CN Quickstart then delay execution of this section)*
#### Close Canton console
When complete, open the Canton console terminal. Run `exit` to stop and remove the console container.
#### Close Daml shell
In the Daml shell terminal, execute `quit` to stop the shell container.
#### Close the CN Quickstart
Finally, close the application and observability services with:
```bash theme={"theme":{"light":"github-light","dark":"github-dark"}}
make stop && make clean-all
```
It is wise to run make `clean-all` during development and at the end of each session to avoid conflict errors on subsequent application builds.
## Next steps
You have successfully installed the CN Quickstart.
The next section, “Exploring The Demo,” provides a demonstration of the example application.
### Connecting your application to The Canton Network
The `LocalNet` deployment connects to a local validator which is in turn connected to a local super-validator (synchronizer). Staging and final production deployments require connecting to a validator that is in turn connected to the public Canton Network.
The Canton Network provides three synchronizer pools. The production network is `MainNet`; the production staging network is `TestNet`. As a developer you will mostly be connecting to the development staging network `DevNet`.
Access to [a SV Node](/global-synchronizer/deployment/onboarding-process) that is whitelisted on the CN is required to connect to DevNet. The CF publishes a [list of SV nodes](https://sync.global/sv-network/) who have the ability to sponsor a Validator node. To access `DevNet`, contact your sponsoring SV agent for VPN connection information.
## Resources
* [Curl](https://curl.se/download.html)
* [Direnv](https://direnv.net/docs/installation.html)
* [Docker Desktop](https://www.docker.com/products/docker-desktop/)
* [Docker Hub](https://app.docker.com/)
* [CF list of SV Nodes](https://sync.global/sv-network/)
* [Digital Asset Docker](https://console.cloud.google.com/artifacts/docker/da-images/europe/public)
* [Nix](https://nixos.org/download/)
* [Quickstart GitHub repository](https://github.com/digital-asset/cn-quickstart)
* [Validator onboarding documentation](/global-synchronizer/deployment/onboarding-process)
* [WSL 2](https://learn.microsoft.com/en-us/windows/wsl/install)
### Closing the application
*⚠️ (If you plan on immediately using the CN Quickstart then delay execution of this section)*
#### Close Canton console
When complete, open the Canton console terminal. Run `exit` to stop and remove the console container.
#### Close Daml shell
In the Daml shell terminal, execute `quit` to stop the shell container.
#### Close the CN Quickstart
Finally, close the application and observability services with:
```bash theme={"theme":{"light":"github-light","dark":"github-dark"}}
make stop && make clean-all
```
It is wise to run make `clean-all` during development and at the end of each session to avoid conflict errors on subsequent application builds.
## Next steps
You have successfully installed the CN Quickstart.
The next section, “Exploring The Demo,” provides a demonstration of the example application.
### Connecting your application to The Canton Network
The `LocalNet` deployment connects to a local validator which is in turn connected to a local super-validator (synchronizer). Staging and final production deployments require connecting to a validator that is in turn connected to the public Canton Network.
The Canton Network provides three synchronizer pools. The production network is `MainNet`; the production staging network is `TestNet`. As a developer you will mostly be connecting to the development staging network `DevNet`.
Access to [a SV Node](/global-synchronizer/deployment/onboarding-process) that is whitelisted on the CN is required to connect to DevNet. The CF publishes a [list of SV nodes](https://sync.global/sv-network/) who have the ability to sponsor a Validator node. To access `DevNet`, contact your sponsoring SV agent for VPN connection information.
## Resources
* [Curl](https://curl.se/download.html)
* [Direnv](https://direnv.net/docs/installation.html)
* [Docker Desktop](https://www.docker.com/products/docker-desktop/)
* [Docker Hub](https://app.docker.com/)
* [CF list of SV Nodes](https://sync.global/sv-network/)
* [Digital Asset Docker](https://console.cloud.google.com/artifacts/docker/da-images/europe/public)
* [Nix](https://nixos.org/download/)
* [Quickstart GitHub repository](https://github.com/digital-asset/cn-quickstart)
* [Validator onboarding documentation](/global-synchronizer/deployment/onboarding-process)
* [WSL 2](https://learn.microsoft.com/en-us/windows/wsl/install)